What is wireshark?
wireshark basics in hindi
wireshark basic tutorial
Hello friends today I am talking about wireshark. This is a free open source tool that also works in mac, windows and linux, it is a network analysis tool that works as an analyzer of packets inside any network, which was started in 1998 by gerald combs wireshark It is very easy to use and safe, which is done by government agencies, corporates and education institutes for the purpose of troubleshooting and education, through this tool, you can see the packets inside the networking in a subtle way, it is a powerful packet sniffer.
how to use wireshark
termux packet capture
termux wireshark
Features of wireshark
It is a powerful network packets sniffer and packet analyzer. It captures and stores all incoming and outgoing packets inside the local network so that offline analysis can be done easily. These tools can be used for any connection such as Bluetooth, Ethernet, wireless (IEEE.802.11), Token Ring, Frame Relay connections etc. It is very important to have knowledge about these tools, whether you are working in any place or system, whether it is a server or other networking, if you know about wireshark, then you can easily do up to 75% troubleshooting. Also can install in Operating system
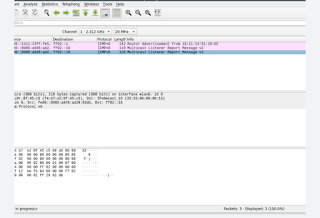
As we all know that it is installed in any operating system and it is built in Kali Linux, there are many menus inside it, now I will tell about them in order wiseYou can see in the image below
How does wireshark work?
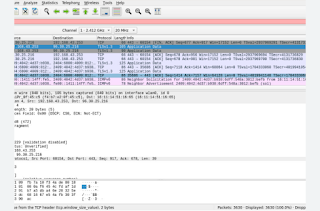
You type wireshark in the terminal of your Kali Linux and as soon as you press enter, the GUI interface of wireshark will open something like this, now below will show the connection in our system, if our system is connected on ethernet then some graph will appear in front of eth otherwise it will Highlighted: As I am working on wireshark via wifi, wlan0 is highlighted in my system, you can start capturing by double clicking on wlan0 otherwise you can start capturing by going to the capture menu or by clicking on its icon You can also start, now all the packets of local network that are flowing in your system will start capturing as you are seeing.

Along with this, 3 pens are made in it, in the first pen the packets are seen with the source and destination of all the packets, what happens in the details of the packet, it is mentioned below.
No - Under this is the ser no which is issued by wireshark
Time - It tells the time of packet capturing
Source - Inside it the IPV4 or IPV6 address of the sender of the packet is hot.
Destination -IPV4 or IPV6 address is hot to whom the packet has been sent inside it.
Protocol:- Which protocol is used in it like TCP or ICMP etc.
Length info- In this, the size of the captured packet along with bytes is shown.

Now let's talk about the second pen, then on clicking on any particular packet in this pen, its other information such as
Frame- Contains the details of the packet inside
Ethernet II - All the details of its data link layer such as MAC address of source and destination are written.
Internet protocol - the details of the network layer are visible inside it
Transport layer - all the details of the transport layer inside it
Query - In this, the details of what has been done by the user are shown.
Now let's talk about pen 3, it shows the bit format of the packet.
Wireshark Filter
Two types of filters can be applied inside it, the first is the display filter and the second is the packet capture filter.
Capture filter
1-First click on the capture menu
2- Select the capture filter
3- wireshark capture filter will open select filter according to your convenience and click on ok
4- If you want to add any filter click on the + sign
display filter
1- First click on analyze menu
Select 2 display filters
3- wireshark display filter will open select the filter according to your convenience and click on ok
4- If you want to add any filter click on the + sign
Advance features of wireshark
graph In this, you can see the graph of any captured packet in packet vs time.
Wireshark flow data
With this we can easily see from which port the data of any packet is going in wireshark and to whom it is going to which port.
Wireshark protocol
Through this option we can also enable or disable the GC protocol
Conversation -
It will show all the conversion sizes of tcp and udp
Important Menus
1-File
Open
Open recent
Merge
Import from Hex dump
Close
Save
Save As
File set
Export specific packets
Export packet dissection
Export packet bytes
Export TLS session key
Export object
Print
Quit
2-Edit
Copy
Find packet
Find Next
Find Previous
Mark/Unmark Packet
Mark All Display
Unmark all Display
Next mark
Previous Mark
Ignore/Unignore all display
Time shift
Packet comment
Delete all packet comment
Configuration Profiles
Preference
3-Capture
Options
Start
Stop
Restart
Capture filter
4- Analyze
Display filter
Display filter macros
Display fillter expression
Apply as filter
Prepare as filter
Conversation filter
Enable protocol
Decode As
Reload Lua Plugin
SCTP
Follow
Expert information
5-Statistics
Captured file properties
Resolve Address
Protocol Hierarchy
Conversation
Endpoints
Packets Length
I/O graphs
Service Response Time
DHCP Statistics
ONC-RPC Program
29West
ANCP
BACnet
Collected
DNS
Flow graphs
Hart-IP
HPFEEDS
HTTP
HTTP2
Same time
TCP stream graph
UDP Multicast Streams
F5
IPV4 statistics
IPV6 statistics
6-Telephony
VOIP calls
ANSI
GSM
IAX2 street analysis
ISUP message
LTE
MTP3
Osmux
RTP
RTSP
SCTP
SMPP operation
UCP message
H.225
SIP Flows
SIP statistics
WAP-WSP Packet Counter
I hope you liked this post


0 Comments